If you are thinking of getting into crossbow hunting or target shooting and are looking to purchase a new crossbow, then this article is for you. As a beginner, you may not know much about crossbows, but that does not mean you should just go out and purchase the most common crossbow you can find. Choosing the right crossbow is very important for you and the model you should be purchasing can vary depending on what you are planning to do with it. In this article, I have mentioned a few things that you must consider while purchasing your first crossbow. Let’s have a look:
Page Contents
Styles
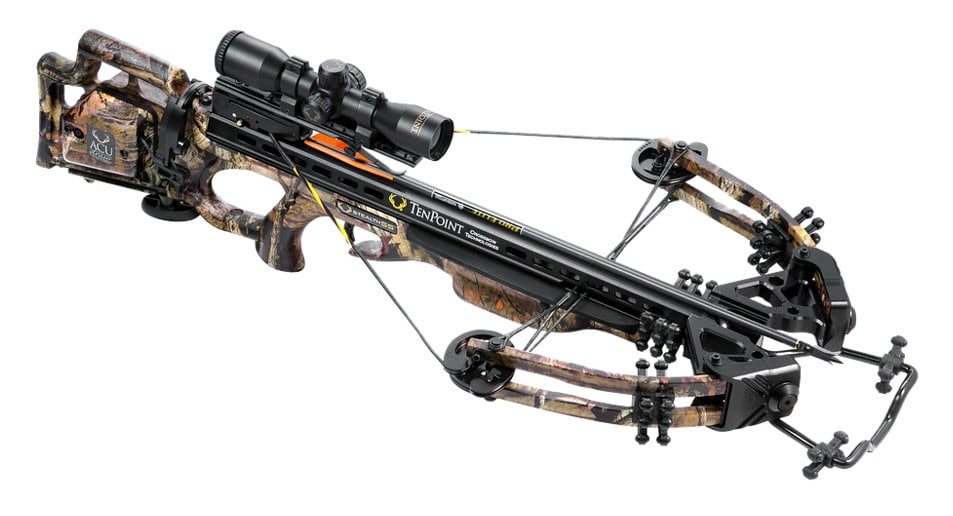
The crossbows come in two major styles, recurve and compound. While choosing among them, you cannot really say that one is better than the other. It mostly depends on the preference of the user. With recurve, you have limbs that are simple and easier to replace. The crossbow cocks like a vertical recurve bow as the farther you pull the string, the more force will be needed. It is recommended that you buy one that you can cock manually. On the other hand, the compound crossbow is much easier as the draw weight is reduced as long as the string reaches the cocking point.
Trigger Pull
If you are a rifle shooter or have some experience with long-range guns, then you must be aware of the importance of the trigger. A lot of crossbow users, even the experienced ones normally ignore this factor, but it can have a huge impact. You should go for a trigger that is smooth and does not have any movement when pressed. You don’t want the trigger to ruin your aim and triggers that move a lot usually end up doing that. Get a trigger that fires with no felt travel and is firm enough for protection.
Weight
Keep in mind; you don’t want to go with a heavy crossbow in the beginning. The heavier the crossbow is, the more difficult it will become for you to practice with it. Get a lightweight crossbow, and you can move swiftly in your hands. If you are getting a crossbow for hunting, then you will be moving around with it in the jungle a lot. If it is a heavy one, it will tire you down quickly, and by the time you spot a deer, you would not have any energy left to hunt it down.
Price and Warranty
You can get a crossbow for as low as $250, and you can get the expensive ones as well that can cost up to $2500. When you are spending a good amount of money on the crossbow, it is only sensible for you to get the one that has a good warranty. The more expensive the bow is the better warranty you will be offered. Also, knowing that if your crossbow ever malfunctions you can get it fixed cheaply will give you peace of mind.
Do you know how to shoot your crossbow?
Once you get your crossbow and put it together, you also need to shoot it. You don’t just start shooting the crossbow, but go over essential rules for safe shooting the crossbow.
First, you should never cock the crossbow unless you are ready to shoot. Also, you should only load it right before you need to fire. Experienced hunters won’t have to follow these tips when hunting where they need to cock the crossbow and load it when in the hunting location. Never aim the crossbow at something you don’t plan to shoot and touch the trigger after you’re lined up with the target and ready to fire.
We also highlight that you have to be 100% sure of what you are shooting at and beyond the target. The crossbow arrow has a lot of energy and can pass through your game animal. Also, you might miss your target, in which case you can only pray for minimal damage of what’s beyond your target.

Aiming with the crossbow
Most modern crossbows have a form of scope or come with a rail to install one. While you look through the scope, you will see a horizontal line intersecting a vertical line in the middle of the scope—known as the crosshair. Briefly said, you need to put the crosshairs where you want the arrow to hit and press the trigger. The scope should be sighted in and the distance for the sighting in should be the distance you shoot. If so, the method will be successful. A dot in the center of the scope will help you aim your crossbow with some models.
In some scopes, you will notice horizontal lines below the primary crosshairs. You should use these lines to shoot at long-range targets, as every horizontal line creates a new crosshair where it meets the vertical line. The further away the target is, the lower the crosshair to use in the scope is, for instance. You have to sight in the scope at around 30 yards and observe how far away your crossbow/scope/arrow combination will affect every crosshair to discover the yardage you should use.
Drawing the crossbow
You will need some elbow grease to draw a crossbow, especially when compared to pulling a regular vertical bow. It’s because most crossbows have a draw that weighs between 150 and 180 pounds; some have draw weights up to 200 pounds. You have to have a uniform method to draw the bowstring to have consistent shots. The most straightforward way to obtain this effect is to use a rope cocking air. It’s a device made to hook to the bowstring on either side of the rail. You can loop it across the back of the crossbow.
Begin with placing the crossbow aimed down at the ground and put your foot in the foot stirrup (it’s a piece that comes out from the crossbow’s end that you use to put your foot in when aimed down. Continue hooking the hooks on the rope cocker on every side of the rail. Take the handles on the end of every side of the rope cocker in your hand. Continue pulling up on the handles with both hands until you sense that the string gets in the firing mechanism you should pull evenly. The cocking will go easier if your use a swift solid pull along the rail. Seek that safety is on and finish by removing the rope cocker.
Firing the crossbow
Now that the crossbow is cocked, you have to put the arrow on the rail. Take the arrow near the point (it’s around four inches back from the tip) and put it back into place on the rail until it touches the bowstring. When you do this, you have to make sure that the vane (typically with a strange color compared to the other two vanes) aims right down in the rail’s slot so that the arrow rests on the rail (it shouldn’t rest on the vanes). Seek that groove in the arrow’s nock is horizontal so that the bowstring goes into the groove. If you use arrows with flat nocks, they will not have a groove in the nock. It’s crucial that the arrow is loaded with the strangely colored vane right down and that the arrow is completed placed back against the string.
When the arrow is in place, you have to aim at the target, take the safety to the “off” position and press the trigger. You will probably hear a slapping sound from the string when you fire. There will barely be a recoil.

Sighting in your crossbow
Once you know how to look through the scope and get how the elements work, you need to sight in the crossbow. Start by unscrewing the caps on the top and scope’s right side. Put the caps aside to see the dials for adjusting the scope to zero it in. Begin with firing the crossbow into a target around 20 yards away so that the scope is close enough to hit a target at 30 yards. If the setup is way off, you should use the dials and adapt where the aim point is found. While examining the dial on the right side, you will notice the letter “l” and an arrow. Therefore, when you click the dial in that direction, you will move the aim point to the left; when going in the opposite direction of the arrow, you will move the aim point to the right.
Therefore, if the arrow is a few inches to the right of the bullseye, you need to move the dial in the arrow’s direction. It’s for adapting the aim point to the left. You should do similarly with the top dial, which typically has the words “up” and an arrow. They inform you that moving the dial in the arrow’s direction brings the aim point up and the other way around. After you get familiar with how the dials adjust the aim point of the scope, you will quickly zero in the scope.